How Can You Keep a Leather Tear from Spreading Before a Repair Appointment?
A tear is not a static problem. Every use loads its ends, and the difference between a small repair and a panel replacement is often two weeks of ordinary sitting.
Quick answer
Stop using that spot, support the material from behind if you can reach it, and cover the tear with a smooth barrier so nothing catches its edges. Leather-repair tape applied to the underside is the safest temporary measure. Do not use superglue, duct tape or any adhesive on the face of the leather — all three contaminate the surface, and the eventual repair then starts with removing your fix before it can begin.
At a glance
| Do | Stop using that seat, support from behind, cover the edges smoothly |
|---|---|
| Best temporary fix | Leather-repair tape or a fabric patch bonded to the underside |
| Never | Superglue, duct tape, packing tape or any adhesive on the visible face |
| Why it spreads | Stress concentrates at the ends of a tear every time the panel flexes |
| Realistic window | Days to weeks on a used seat — not months |
Why a tear grows
Leather under tension behaves like any sheet material: stress distributes evenly until something interrupts it, and then it concentrates at the interruption.
A tear is that interruption. At each end of the opening, the material either side is pulling apart, and all the load that used to spread across a continuous surface now runs through those two points.
Every time someone sits down, the panel stretches, the ends take the load, and a few fibers let go. It is not dramatic and you will not see it happen. You will simply notice, two weeks later, that the tear is longer.
The rate depends on where it is. A tear on the flat back of a sofa, which nothing touches, may not move for a year. The same tear on a seat cushion or a car seat bolster grows measurably in days.
This is why the honest answer to how long you can wait is a question rather than a number: how often does anything load that spot?
Step one: take the load off it
The single most effective thing costs nothing and takes a minute.
Stop using that seat. Move the family to the other end of the sofa, swap the cushions around if the piece allows it, sit in the passenger seat, put a chair in the way if that is what it takes.
On a sofa, swapping the damaged cushion with an unused one from the other end achieves two things: it stops the tear being loaded, and it evens out wear across cushions that were already aging at different rates.
In a vehicle, the driver's seat cannot be swapped, but changing how you get in helps — sitting down before swinging your legs in, rather than sliding across the bolster, removes most of the stress on the usual failure point.
None of this repairs anything. It buys time, which is exactly what is needed.
Step two: support the material from behind
If you can get to the underside of the panel, a backing does the real work.
The principle is the same one a professional repair uses: something bonded behind the opening carries the load that the torn material can no longer carry, so the ends stop being pulled apart.
Leather-repair tape is the accessible version. It is a fabric-backed adhesive material made for this purpose, and applied to the underside of a tear it stabilizes it well. Cut it generously — the patch should extend well past both ends of the tear, not just cover the opening.
On a cushion with a zip, this is straightforward: unzip the cover, reach in, and apply the patch to the inside surface.
On a fixed panel where the back is unreachable, a small piece of tape or fabric can sometimes be worked through the tear itself with tweezers and smoothed against the underside. It is fiddly, and it is far better than anything applied to the face.
If you genuinely cannot reach the underside, skip this rather than compromising by working on the front.
Step three: stop the edges catching
Open tear edges snag on clothing, bag straps, buckles and pet claws, and every snag pulls the opening wider.
A smooth cover over the area prevents that. A throw over the cushion, a towel over a car seat, a fitted seat cover — anything that means nothing contacts the edges directly.
Keep it smooth rather than tight. A cover pulled taut over a tear adds tension across the opening, which is the opposite of what you want.
If a flap of leather is hanging loose and catching, it can be trimmed carefully with sharp scissors flush with the surrounding surface. Do not trim into sound material — the repair will need as much original leather as possible to work with.
Do not tuck a loose flap into the opening. It creases, hardens in that position, and makes the eventual repair harder to level.
What not to use, and why it costs you
Every item here makes the eventual repair more expensive, because it has to be removed before any proper work can start.
Superglue is the most common and the most damaging. It is rigid, so it cracks at its edges the first time the panel flexes. It penetrates the fiber so it cannot simply be peeled off. It leaves a hard, shiny area that will not take filler or color. Removing cured cyanoacrylate from leather without damaging the hide is genuinely difficult.
Duct tape and packing tape leave adhesive residue on the surface that contaminates it, and when pulled off they frequently take the finish — sometimes the grain layer — with them. A tear covered with duct tape for a month often has a rectangle of missing finish around it.
Fabric glue and craft adhesives are usually rigid when cured and are not formulated for a flexible substrate.
Sewing the tear closed by hand puts new holes in leather that is already stressed and pulls the edges into a pucker that has to be released before it can be rebuilt properly.
The general rule: nothing on the face, nothing rigid, nothing you cannot remove.
How long you actually have
It is worth being realistic, because the honest answer changes how people prioritize.
A tear on a seat cushion or a car seat bolster in daily use: days to a couple of weeks before it grows noticeably. These are the ones worth treating as urgent.
A tear on an armrest or a headrest: a few weeks, depending on use.
A tear on an outside back, an outer arm or any panel nothing touches: months, sometimes indefinitely, as long as nothing catches it.
A split seam anywhere: fast. Seams carry load along their whole length, so once stitching starts failing, the failure runs. A seam caught in the first week is a quick restitch; the same seam a month later has torn the material either side of it and needs rebuilding as well as sewing.
In every case the stabilizing measures above extend that window substantially — often enough to turn an urgent problem into a scheduled one.
The Texas complication
Local conditions shorten these windows, particularly in vehicles.
Dry conditioned air stiffens leather, and stiff leather tears more readily than supple leather. A panel that has been drying out for years has less give at the ends of a tear, so the fibers let go sooner under the same load.
Heat compounds it. A parked outside in a Dallas summer reaches cabin temperatures far above ambient, and repeated heating and cooling cycles work the material at the tear ends even when nobody is sitting in it.
UV exposure has already embrittled the finish on any sun-facing panel, so a tear in that panel is surrounded by material that is itself close to failing.
The practical adjustment: if the tear is in a vehicle, park in shade while you wait, and treat the timeline as shorter than it would be indoors.
When a tear needs attention immediately
A few situations should not wait for a convenient appointment.
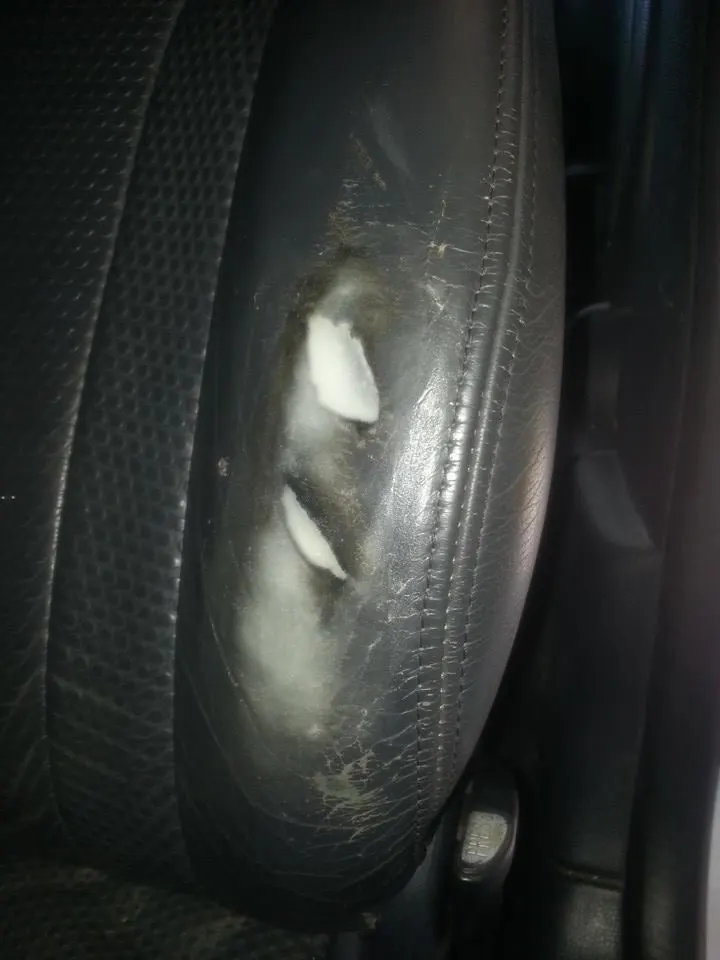
Any tear where foam is exposed. Foam abrades, absorbs moisture and compresses unevenly, and once the cushion core is damaged the job stops being a surface repair.
Any tear at a seam that is actively running. Seam failures accelerate rather than progressing steadily.
Any tear in a vehicle seat where the edges are being loaded on every entry, because that is the fastest-growing case there is.
And anything on or beside a seat-mounted airbag seam — not because it will spread, but because it needs an automotive trim shop working to the manufacturer's specification rather than a cosmetic repair. Look for an 'SRS' or 'AIRBAG' tag on the outboard edge of the seat back.
Photographing a tear so it can be assessed properly
Tears are one of the easier things to assess remotely, provided the photographs show the ends as well as the opening.
Take a wide shot of the whole piece so the position of the tear is clear — position determines the approach more than length does.
Take a close-up square-on from about a foot away with something for scale beside it, a coin or a card.
Take a third shot from a low raking angle across the surface, which shows whether the edges are lifting and how much material has been lost.
Photograph the ends of the tear specifically. That is where a specialist reads whether it is still propagating and how sound the surrounding material is.
And press a thumb on the leather a few inches away, then photograph that area — if fine cracks appear, the panel is failing as well as torn, which changes the recommendation from a repair to a panel refinish.
What happens at the repair
Knowing the sequence makes it clearer why the temporary measures matter.
The area is cleaned and degreased. Any temporary adhesive has to come off first, which is the stage your choice of stabilizer affects.
The edges are trimmed or sealed so the surface is continuous, and a backing material is bonded behind the opening — the permanent version of the tape patch.
Flexible filler is built up through the void in thin layers, each allowed to cure, so the repair flexes with the panel rather than cracking at its border.
Grain is pressed into the final layer to match the surrounding texture, color is sprayed and feathered well past the repair, and a flexible topcoat seals it.
A tear that was kept small and clean disappears into the panel. A tear that grew for two months and was glued produces a bigger, more expensive job with a less certain result — which is the entire argument for the fifteen minutes of damage control described above.
Questions we get asked next
- Can I use leather repair tape as a permanent fix?
- No, but it is the right temporary one. Applied to the underside it stabilizes a tear without contaminating the visible surface, which means the proper repair can start on clean material. Applied to the face, it becomes another thing that has to be removed first.
- I already used superglue. Have I ruined it?
- Usually not ruined, but the job is now larger. Cured superglue has to be removed or worked around before filler and color will bond, and that is skilled, slow work. Tell whoever assesses it exactly what was used, so they can plan for it rather than discover it.
- Should I trim the loose edges of a tear?
- Only anything hanging loose enough to catch, and only flush with the surrounding surface using sharp scissors. Do not cut into sound leather — a repair works better with as much original material as possible, and removing more than necessary widens the area that has to be rebuilt.
- The tear is on the back of my sofa where nobody touches it. Do I need to rush?
- Much less than a seat tear, since nothing is loading the ends. Cover it so clothing and pets cannot catch it, and schedule the repair at your convenience. It is still worth doing eventually, because an open tear collects dust and its edges harden.
Sources
- Federal Motor Vehicle Safety Standard No. 208, Occupant Crash Protection — U.S. National Highway Traffic Safety Administration, checked 2026-08-21
- tears
- temporary fix
- damage control