Can a Bad Previous Color Repair Be Removed and Matched Correctly?
A bad color job is usually visible for one of four reasons, and knowing which one you are looking at tells you how much has to come off first.
Quick answer
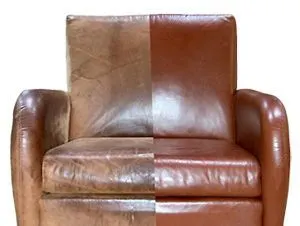
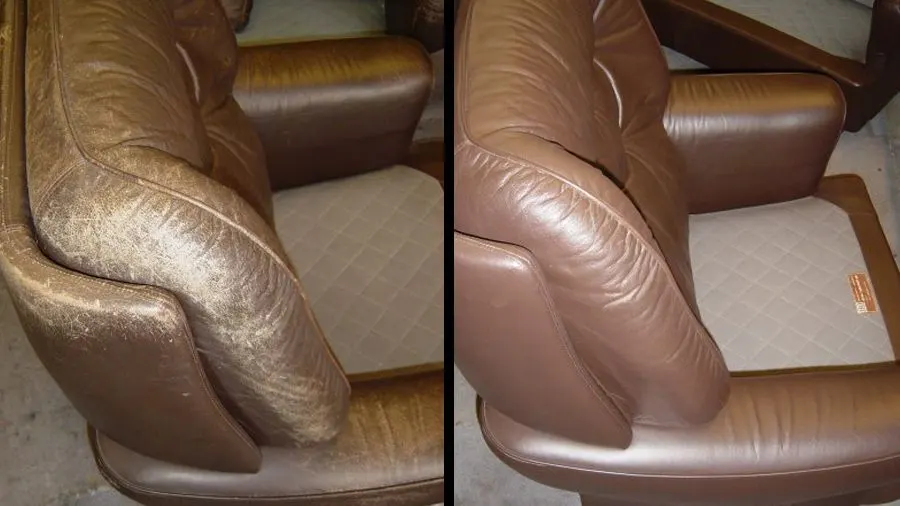
Yes, in almost every case. Bad color work fails for four reasons: the shade is wrong, the sheen is wrong, the edge was brushed rather than sprayed and left a halo, or the coating is too thick and feels like paint. All four are corrected by removing the applied color, taking the surrounding area back to a clean feathered edge, and rebuilding in thin layers with a matched sheen. The removal stage is what makes it cost more than doing it right the first time.
At a glance
| Wrong shade | Matched by eye or from a chart rather than against the leather |
|---|---|
| Wrong sheen | Matte patch in a satin panel, or vice versa. Visible even when color is perfect |
| Hard edge or halo | Brushed rather than sprayed, so there is a boundary to find |
| Paint-like feel | Too many coats, too thick. Stiff, plastic, and it will crack |
| Correction | Remove, feather the surround, rebuild thin, match the sheen |
The four reasons a color repair looks wrong
Almost every complaint about a visible color repair comes down to one of four causes, and identifying which one you have is the first step.
Shade. The applied color is not the color of the leather around it. Most obvious under a lamp, because a match made in daylight often diverges under a different light source.
Sheen. The color may be perfect and the area still reads as a patch, because it reflects light differently. A matte repair in a satin panel is visible from across the room.
Edge. Color applied with a brush or a sponge has a boundary. Sprayed color can be feathered so there is no edge for the eye to find; brushed color always has one.
Thickness. Too many coats, applied too heavily, produce a surface that feels like paint rather than leather — stiff, slightly plastic, and destined to crack at its border the first time the panel flexes properly.
Many failed jobs have two or three of these at once, which is why they look so obviously wrong even to people who cannot say why.
Why shade matching goes wrong
The commonest single cause is matching to the wrong reference.
Furniture and automotive leather is rarely one flat color. Most finishes are built from a base coat, a topcoat, and often a subtle shading pass. Mixing a single pigment to match what your eye reads produces the average of those layers, which is close in one light and wrong in another.
The second cause is matching from a chart. A chart shows flat colors under standard lighting. Your sofa is a layered finish in your room, and the two do not correspond.
The third is matching to a faded or soiled area rather than to the true color. A repair matched to a sun-faded panel looks correct until the rest of the piece is cleaned or refinished, at which point it is permanently wrong.
The fourth is judging wet color. Pigment reads noticeably darker wet than dry, so a match approved before it cured is usually too light once it dries.
Correct practice is mixing against the actual leather, testing on a hidden area, letting it dry fully, and checking it in daylight and again under the room's evening lighting.
Sheen: the one people cannot name
This is the most frequently missed cause, because the complaint is usually phrased as a color problem.
Sheen is how much light a surface reflects specularly. Matte scatters it, gloss returns it, and there is a continuous range between.
A repair finished at a different sheen from its surroundings shows as a bright or dull patch that changes as you move your head, even when the pigment underneath is a perfect match.
Worn areas complicate it. Friction raises sheen, so the seat front of an old sofa is glossier than the back. Matching a repair on the seat to the back's sheen produces a mismatch; matching it to the polished seat preserves the wear.
The right answer is usually bringing a whole panel to a consistent sheen rather than matching a repair to a worn value.
Sheen is set at the topcoat stage, and it is a specific choice. If the previous work did not involve a conversation about it, that is often why the repair is visible.
Why thickness matters more than it sounds
A repair that feels like paint is not just unpleasant to touch. It is going to fail.
Leather flexes constantly. A finish is engineered to flex with it, which is why it goes on in several thin coats rather than one heavy one.
A thick coating behaves like a rigid layer sitting on a flexible substrate. The first time the panel bends properly, the coating cracks at its border, and once cracked it starts lifting.
This is the classic outcome of a consumer color kit used enthusiastically: excellent coverage, hard edge, and a network of fine cracks around the repair within a few months.
It is also why correcting it means removing rather than adding. Applying more color over a thick repair produces a thicker one.
How the correction is actually done
The sequence is a removal followed by the standard job.
The applied color is softened and taken off with the appropriate preparation products. This is where product choice matters most — the wrong solvent removes the bad repair and the surrounding original finish together, which turns a spot correction into a panel refinish.
Any filler underneath is assessed. Thin flexible filler can often stay if it is level and sound; thick rigid filler generally comes out.
The surrounding area is taken back and feathered, so the new color has a clean, gradual edge to blend into. This is why a correction frequently covers more area than the original repair did.
The surface is degreased and keyed. Anything applied over residue lifts.
Then the normal sequence: level and texture if needed, mix color against the actual leather, test on a hidden area, spray in thin coats feathered well past the repair, and seal with a topcoat at the matched sheen.
Checked in daylight and evening light before it is called finished.
When it was a professional job that went wrong
Not every bad color repair came from a kit, and it is worth knowing what to do if you paid for it.
Go back to whoever did the work first. A repair that is visibly wrong within weeks is a reasonable thing to raise, and most specialists would rather correct their own work than have it stand as an example.
Be specific about what is wrong. 'The color is off under the lamp but fine in daylight' or 'it feels stiffer than the leather around it' gives someone something to act on, where 'it looks bad' does not.
Ask what sheen was used and whether the color was mixed against the piece. Both answers tell you a lot about whether a correction from the same hands is likely to be better.
If you go elsewhere, tell the second specialist that professional products were used rather than a consumer kit. The removal approach differs, and it is useful information rather than an accusation.
Layered and specialty finishes
Some finishes make a bad match almost inevitable if the work was approached as a single color, and correcting them is a rebuild rather than a repaint.
Antiqued, two-tone and hand-rubbed finishes are built in layers: base, shading pass, sometimes a highlight, then topcoat. A single mixed color applied over a repair is flat where the surroundings vary, and the eye finds it immediately.
Correcting these means removing the flat color and rebuilding the layers in the original order, matching the density and placement of the shading rather than just its hue.
Metallic and pearlescent finishes depend on how reflective particles are oriented during spraying, so a correction has to reproduce the application as well as the color, checked from several angles.
High-gloss finishes magnify any unevenness beneath, so the removal and leveling stages have to be more thorough than on a matte piece.
In all of these, ask to see a test before the work proceeds. On a layered finish that is standard practice rather than an unusual request.
What it costs relative to doing it once
Nobody can quote without seeing it, but the shape is consistent.
A thin, badly matched color coat over an otherwise sound surface adds a modest amount — cleaning and keying rather than a rescue.
A thick coating with a hard edge adds more, because it has to come off and the surround has to be feathered back further than the original damage.
Where the wrong solvent has already been used in an attempt to fix it, the surrounding finish may be damaged too, and the scope grows to the panel.
There is also usually a scope effect: pieces with failed color work have often stayed in use while the repair deteriorated, so the underlying damage is larger than it was.
The honest framing is that correction costs more than the original job would have, and it produces the same end result. It is rarely a lost cause and it is rarely cheap.
Avoiding it the second time
Four questions before booking, all of which a specialist should answer easily.
How will the color be matched? The answer should be against your leather, not from a chart or a stock shade.
Where will it be tested, and can I see the test dry before you proceed? A test on a hidden area, viewed in daylight and evening light, is standard on anything but a plain dark finish.
What sheen will the topcoat be, and how are you matching it to the rest of the piece?
How will the edge be blended? Sprayed and feathered is the answer that produces an invisible repair; brushed always leaves a boundary.
On a layered or specialty finish, add: how will you rebuild the layers? If the answer describes a single color, that is the conversation to have before the work rather than after.
What to send for an assessment
Photograph the repaired area square-on in daylight and again under the room's artificial light. The difference between those two images is often the whole diagnosis.
Take a third from a low raking angle across the surface, which shows the edge, the sheen difference and whether the coating is proud of the surrounding leather.
Photograph an undamaged, unrepaired area of the same piece for reference.
Run a fingertip across the boundary and describe what you feel — a ridge, a change in texture, a stiffer area.
And say what was used, whether it was a kit or a professional, and roughly when. Consumer pigment and professional systems come off differently, and knowing which is which shortens the removal stage considerably.
Questions we get asked next
- Can bad color just be covered with the correct color?
- Not reliably. Coating over a thick or badly bonded layer inherits its problems — the border keeps cracking and the whole thing lifts together. Removal is what makes the new work durable, which is why it is part of the job rather than an optional extra.
- The color looks right in daylight and wrong at night. Why?
- Because it was matched under one light source only. Different lights emphasize different parts of the spectrum, and a layered leather finish responds to that more than a flat pigment does. A proper match is checked in daylight and under the room's evening lighting before the work proceeds.
- My repair feels stiff compared with the rest of the sofa. Is that fixable?
- Yes, and it should be fixed rather than lived with. Stiffness means the coating is too thick, and a thick coating cracks at its border under normal flexing. Removing it and rebuilding in thin layers restores both the feel and the durability.
- Should I ask the original specialist to fix it, or go elsewhere?
- Ask them first, with a specific description of what is wrong. Most would rather correct their own work. If the answer is that it looks fine, or if the second attempt has the same problems, going elsewhere is reasonable — and tell the new specialist that professional products were used, since that changes how removal is approached.
- color matching
- failed repair
- recoloring