How Do You Restore a Vintage Leather Chair Without Erasing Its Character?
On a vintage chair the technical work is the easy part. The judgment is deciding how much of its history to keep.
Quick answer
By treating patina and damage as different things. Patina is even, honest aging — mellowed color, softened sheen, gentle wear at contact points — and it is most of what makes a vintage chair appealing. Damage is discontinuity: cracks, splits, holes, failed finish, structural problems. The right approach stabilizes and repairs the damage while leaving the aged character intact, which means cleaning and conditioning rather than stripping, and localized repair rather than full recoloring.
At a glance
| Patina | Even aging — mellowed color, soft sheen, gentle contact wear |
|---|---|
| Damage | Discontinuity — cracks, splits, holes, failed finish |
| Default | Clean, feed and stabilize before considering anything more |
| Irreversible | Stripping the finish and full recoloring cannot be undone |
| Decide first | The brief matters more than the technique on a vintage piece |
Why the usual approach is wrong here
On modern furniture the objective is clear: make it look as close to new as possible. Recoloring a faded sofa evenly is straightforwardly a good outcome.
On a vintage chair that same work can destroy most of its value and all of its appeal.
The color variation, the softened sheen, the darker patches where hands have rested for decades — those are why somebody wanted the chair.
A uniformly recolored vintage chair looks like a reproduction. It may look excellent and it no longer looks old, and the thing that made it interesting is gone.
That is not a reason to leave damage untreated. Cracks spread, splits open, and a chair that is deteriorating will keep deteriorating.
It is a reason to separate the two questions: what is failing and needs work, and what is simply old and should be left.
Getting that separation right is the whole job, and it is a conversation before it is a technique.
Telling patina from damage
The distinction sounds abstract and it is actually fairly practical.
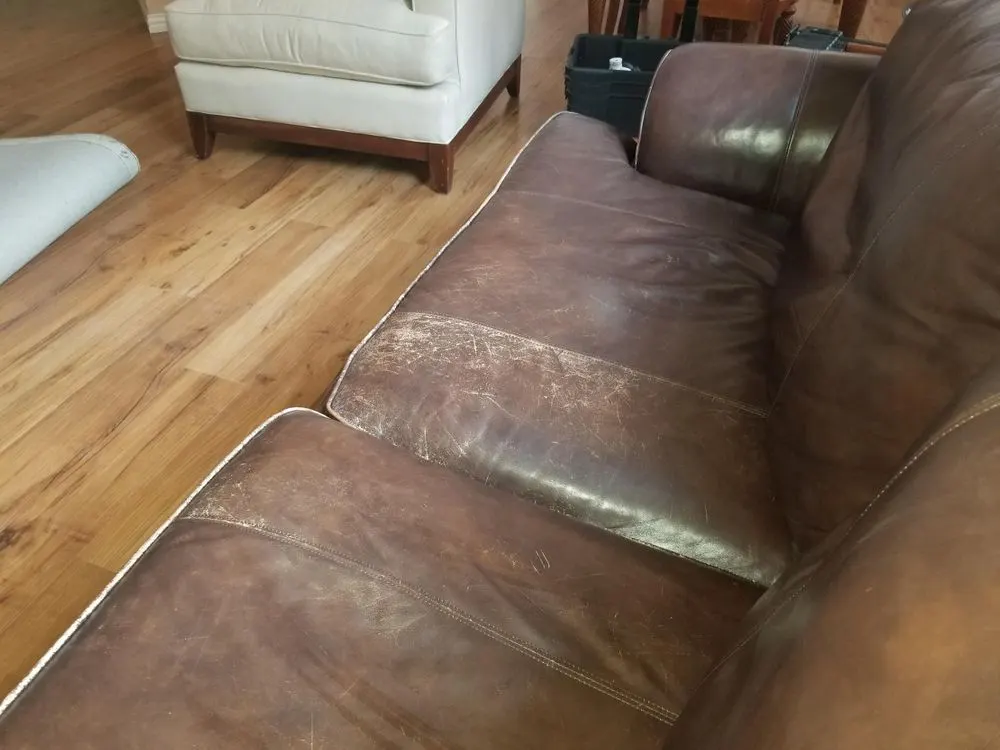
Patina is even and gradual. Color that has mellowed across a whole panel, a sheen that has softened where hands rest, darkening that follows use, a hide that has become supple and characterful.
It has no edges. It fades from one state to another rather than stopping abruptly.
Damage is discontinuous. A crack has an edge. A split has a boundary. A hole has a shape. A failed finish has a line where it lifted.
Damage also progresses. Patina reached its current state slowly and is largely stable; a crack will be longer next year.
So a useful test is to ask whether the feature has an edge and whether it is getting worse. If yes to both, it is damage. If no to both, it is patina.
The middle cases — a worn arm where the color has gone thin but the hide is sound — are where judgment lives, and where the owner's preference should decide.
Establish what the chair actually is
Before deciding anything, it is worth knowing what you have, and this step is routinely skipped.
Many vintage chairs have been reupholstered at some point, sometimes decades ago. What looks original may not be.
Look at the stitching, the thread, the tacks or staples, and the construction under the seat. Hand-driven tacks and webbing point to older work; staples point to later intervention.
Look at the leather itself. Older furniture leather is frequently thicker and more lightly finished than modern hide, which changes both how it ages and what it will accept.
Look for maker's marks, labels or stamps, usually under the seat or on the frame.
If the chair is a recognized design, owners' groups and reference material will tell you what the original specification was.
This matters because the preservation argument is much weaker if you are preserving somebody's 1980s retrim than if you are preserving original material — and knowing which changes the recommendation.
Start with cleaning and feeding
On a vintage chair this is not a preliminary step. It is often most of the result.
Decades of accumulated soil, body oil, old dressings and general grime sit on the surface, and they flatten and dull the leather considerably.
A thorough clean with an appropriate product frequently transforms a chair that looked beyond help, and nothing has been removed except dirt.
Then feeding. Old leather is usually dry, and restoring suppleness is both an appearance improvement and a genuine conservation measure, since supple leather cracks far less than stiff leather.
This takes patience — several light applications with time between rather than one heavy one — because dry old hide absorbs slowly and a heavy application sits on the surface.
The important property of this stage is that it is reversible in the sense that nothing has been altered. The chair is cleaner and more supple and it is still the same chair.
Many owners find they want nothing further once this is done, which is why it should always come first.
Stabilizing rather than refinishing
For damage on a vintage chair, the objective is usually to stop it rather than to erase it.
A finish that is powdering or lifting can be consolidated so it stops shedding, without being stripped and replaced.
Cracks can be filled and stabilized so they do not spread, and colored to blend into the surrounding aged tone rather than to a uniform new color.
Splits and tears can be backed and closed, which is structural work and does not affect the character elsewhere.
Worn-through areas can be rebuilt locally, matched to the adjacent aged color rather than to a factory reference.
The distinguishing feature of all of this is that the work is confined to the damage and matched into the surroundings, rather than the panel being taken back to a uniform state.
It is more skilled and slower than full refinishing, because every repair has to disappear into a surface that varies, and there is no option to make everything match by recoloring it all.
When full recoloring is the right choice
Sometimes it is, and pretending otherwise leaves owners with a chair they do not enjoy.
Where the color has gone patchy and blotchy rather than mellowing evenly, so the appearance is uneven rather than characterful.
Where the finish has failed widely, leaving areas that are shedding or that soil constantly.
Where a previous retrim used unsympathetic material, so there is no original character to preserve.
Where the chair is for daily use in a modern room rather than for its historical interest, and the owner wants it to look good rather than old.
And where the damage is so extensive that stabilizing it individually would cost more than refinishing the panel.
The important thing is that it is a decision the owner makes with the trade-off explained, rather than the default a specialist applies. Once a vintage chair has been fully recolored, the patina is not coming back.
The frame, springs and stuffing
On older furniture the structure often needs more attention than the leather, and it should be assessed first.
Joints on a chair fifty or more years old are frequently loose, and a chair that racks or creaks needs the frame attending to before anything cosmetic.
Traditional sprung seats can have failed webbing or broken ties, which shows as a seat that dips or feels uneven.
Horsehair, coir and cotton stuffing in older chairs compresses and migrates, leaving hard and hollow areas.
Rebuilding a traditionally sprung and stuffed seat is specialist upholstery work and it is what makes an old chair comfortable again — surface work does nothing for it.
It is also work that generally requires the leather to come off, which is the moment to decide about the covering rather than after.
So the sensible order on a vintage chair is: assess the structure, decide the covering strategy, then do the work in that order rather than the reverse.
What not to do to an old chair
Some common instincts are actively destructive on aged leather.
Do not strip the finish to start fresh. It is irreversible, it removes the patina entirely, and on old hide it can expose a surface that will not accept a modern finish evenly.
Do not use saddle soap on furniture leather, including old furniture leather. It is formulated for thick unfinished harness hide and it dries and dulls furniture leather.
Do not use household oils, which darken permanently and go rancid over months.
Do not apply heavy dressings to build a shine. Old leather looks best with a soft low sheen, and a glossy vintage chair looks wrong to anyone familiar with them.
Do not discard original material, tacks, labels or covering if any is removed. Keep everything.
Do not let anyone start work without agreeing the brief. The single most common bad outcome on a vintage chair is a technically competent job done to the wrong specification.
And do not rush. Nothing about an old chair is urgent except active structural failure.
Deciding the brief before the work
This is the conversation that determines whether an owner is happy, and it should happen explicitly.
What is the chair for — display, occasional use, daily use, resale?
Is its value in its originality, in its design, or simply in the fact that you like it? Those lead to different answers.
How much of its history do you want visible? Some people want every mark kept; others want a chair that looks cared for rather than old.
Are there specific features to preserve — a particular darkened area, a mark with a story, the color as it is now?
Is there anything you actively dislike about how it looks now?
A specialist should ask all of this before quoting, and one who does not is deciding something that belongs to the owner.
It is also worth photographing the chair thoroughly before any work, both as a record and because opinions about what should have been kept sometimes change.
What to send for an assessment
Photograph the whole chair from several angles in daylight.
Photograph each area of damage close up and at a raking angle.
Photograph the areas you consider character rather than damage, and say so explicitly — this is the most useful thing you can include.
Photograph underneath the chair, including the frame, webbing and any labels or stamps.
Press the leather in several places and say where it is supple and where it is board-like.
Say what you know of the chair's history, including any previous restoration.
Say what the chair is for and how much of its age you want to keep.
And say whether it creaks, racks or dips when sat in, since structural work changes the whole plan.
Questions we get asked next
- Will restoring my vintage chair ruin its value?
- It can, if it is fully recolored. Stabilizing damage, cleaning and feeding the leather generally preserve or improve value, because they stop deterioration without removing character. Stripping and uniform refinishing is the irreversible step, and it should be a deliberate choice.
- How do I tell patina from damage?
- Ask whether it has an edge and whether it is getting worse. Patina is even and gradual with no boundary, and it is largely stable. Damage is discontinuous — a crack, a split, a lifted finish — and it progresses. Features that are both are the ones worth discussing.
- Can old cracked leather be repaired?
- It depends on whether the hide still flexes. Leather that is stiff but sound can be cleaned, fed, stabilized and locally repaired. Leather that cracks in new places as soon as it moves has lost its plasticity, and no surface work restores that.
- Should I do anything before getting advice?
- Only a gentle clean with a leather-appropriate product, if you are confident of the leather type. Avoid saddle soap, household oils and anything that builds a shine — those are the treatments that most often make a vintage chair harder to help afterward.
- vintage
- patina
- restoration