Can Pressure Marks and Dye Transfer from a Child Seat Damage Vehicle Upholstery?
Child seats leave three different marks on a vehicle seat, and only one of them is genuinely permanent.
Quick answer
Three marks, three outcomes. Pressure indentations from the base usually recover once the seat is removed, faster with warmth and time. Abrasion where the base has rubbed against the leather is a surface repair. Dye transfer from the child seat's own fabric onto light upholstery is the difficult one and sometimes needs refinishing. Any protective mat used underneath must not change how the child seat installs or how tightly it can be secured.
At a glance
| Pressure marks | Usually recover over days to weeks once the seat is out |
|---|---|
| Abrasion | Where the base rubbed. Surface repair, straightforward |
| Dye transfer | From the child seat's fabric onto light leather. The hardest of the three |
| Cracking under the base | Where the seat was fitted over already-stiffened leather |
| Protective mats | Only if they do not affect installation or belt routing |
The three marks and how to tell them apart
Lift a child seat out after a couple of years and there is usually something underneath. What matters is which of three things you are looking at.
An indentation, where the base has compressed the seat cushion and the leather over it. The surface is intact — it is a shape rather than damage.
Abrasion, where the base or its feet have rubbed against the leather with every movement of the vehicle. The finish is worn, dulled or scuffed in specific contact spots.
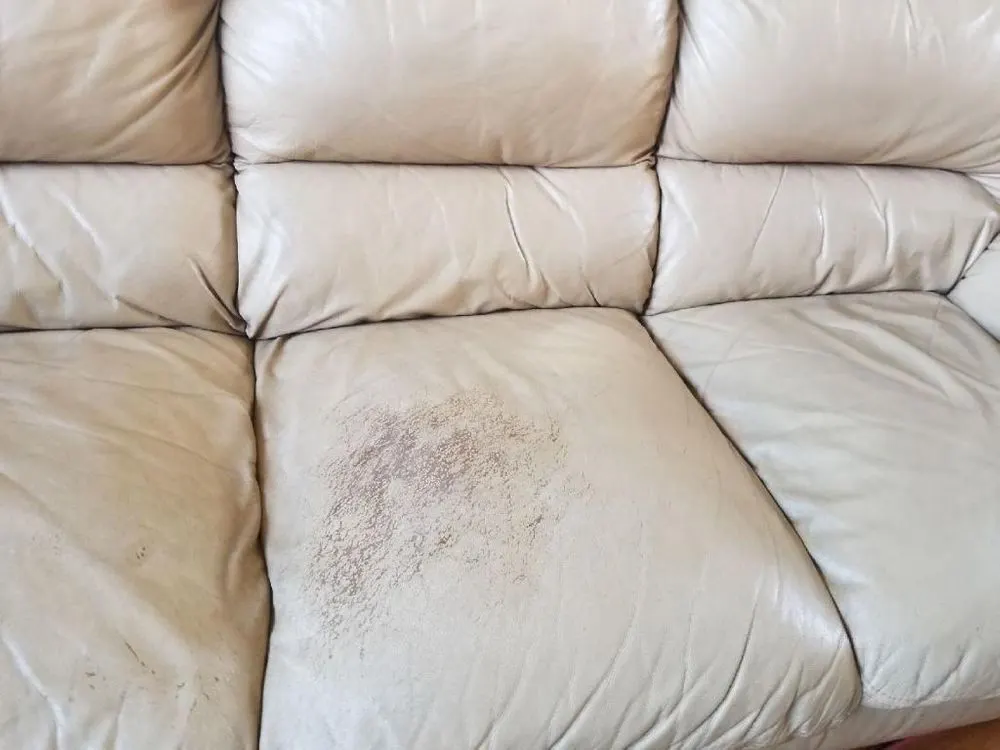
Discoloration, where dye from the child seat's own fabric or plastic has transferred onto the upholstery. Usually a gray or colored haze on light interiors.
Many vehicles show all three, and each needs a different answer. The mistake is treating an indentation as damage and starting to work on it, which is how a recoverable mark becomes a real one.
Pressure marks usually recover on their own
This is the reassuring part and it is worth knowing before anyone spends money.
Foam under compression for a long period takes a set, and the leather over it follows that shape. Once the load is removed, both recover — the foam expands, the leather relaxes back.
It takes time. Days for a light impression, weeks for a deep one from a seat that has been fitted for years.
Gentle warmth helps. Parking in mild sun, or simply the ordinary heat of a car in this climate, speeds the recovery of both the foam and the leather. This is one of the few situations where cabin heat is on your side.
Do not press, massage or work at the area. That does nothing for foam and risks abrading a finish.
Do not use a hairdryer or a heat gun. Concentrated heat is the way to turn a recoverable impression into permanently hardened leather.
If a deep indentation has not improved after several weeks of the seat being out, the foam has taken a permanent set — which is a cushion question rather than a leather one.
Abrasion under the base
This is real damage and it repairs straightforwardly.
A child seat moves slightly with every corner, brake and bump. Its base, feet and any rigid points rub against the leather beneath, and over a couple of years that abrades the finish in specific spots.
The visible result is dulled, scuffed or lighter areas corresponding to the base's contact points, sometimes with the pattern of the base's underside readable in the wear.
It is a surface repair: cleaned and degreased, leveled where the finish has thinned, textured to match and recolored with the blend extending across the panel so no boundary shows.
It matters most on light interiors and on vehicles being sold, since the rear seat is exactly where a buyer with a family will look.
Catching it while it is dulling rather than after the pigment has worn through keeps it a smaller job — which is an argument for lifting the child seat and looking underneath occasionally rather than at the end.
Dye transfer is the difficult one
The child seat's own materials are the culprit here, and it catches parents out because nothing was spilled.
Child seat covers are fabric, often dark, and like any textile they can release dye under warmth and pressure. The plastic shell and its trim can do the same.
In a hot vehicle, pressed against a light leather seat for months, that transfer is inevitable rather than unlucky.
On a sealed pigmented finish, fresh transfer sits on the topcoat and cleans off with an appropriate cleaner worked across the whole panel. That is the good case.
Transfer that has been in place for a year or more bonds into the finish. Cleaning lifts a proportion and a residual tint remains, which is a refinishing job rather than a cleaning one.
Where the topcoat has already been abraded by the base — which is common, since the same contact area does both — the dye reaches the pigment layer and cleaning it means removing the seat's color with it.
So the two problems compound, and that is why the area under a child seat base is often the one panel in a family car that genuinely needs refinishing.
Cracking under the base
A fourth, less common finding, and it is worth naming because it is the one that means the seat itself was already at risk.
Where leather had already stiffened from heat and age, sustained compression under a child seat base can crack it — usually in fine lines following the edge of the base.
This is not the child seat's fault so much as evidence that the leather had lost its flexibility. A supple hide compresses and recovers; a stiff one splits.
It is repairable in the normal way — filled, textured, recolored — and it is a signal to check the rest of the interior, because a panel that cracked under compression is unlikely to be the only stiff one.
It is also an argument for conditioning rear seats, which almost nobody does because they are not the seats anyone sits in.
Protective mats: useful, with a hard condition
The obvious answer is a mat under the child seat, and it is a good one provided it does not compromise the installation.
The condition is not negotiable: a child seat has to install securely, with the correct belt or lower-anchor routing, and be tightened to the manufacturer's specification. Anything placed underneath that changes the angle, introduces slack, or prevents the seat being tightened properly is a safety problem, not a convenience question.
Child seat manufacturers vary in what they permit underneath, and some prohibit anything at all. Their instructions are the authority here, and NHTSA's guidance is to follow both the child seat manual and the vehicle manual on installation.
Where a mat is permitted, thin, firm and grippy is the right specification — a thick padded mat is more likely to introduce compressible slack.
Whatever is used, the installation should be checked afterward: the seat should not move more than the manufacturer allows at the belt path, and the recline angle should still be correct.
If in doubt, a certified child passenger safety technician can check the installation. Many fire departments and hospitals in the metroplex offer inspections.
Why this is worse in a Texas vehicle
The mechanism is heat, and it affects all three marks.
Cabin temperatures in a parked car here run far above ambient for months. Warm foam takes a set more readily under sustained compression, so indentations are deeper.
Warm leather is softer and more receptive, so dye transfers from the child seat's fabric faster and bonds sooner.
And repeated heat cycling drives plasticizers out of the leather, so a rear seat under a child seat base stiffens on the same timeline as everything else while being held under compression — which is the combination that produces cracking.
Light interiors, common here for heat reasons, show the dye transfer most.
The practical implication is that the interval for checking underneath is shorter here. Every few months rather than when the seat finally comes out.
A routine that prevents most of it
Small habits, and they cost nothing.
Lift the child seat out every few months and look underneath. Reinstalling correctly takes a couple of minutes and it is worth doing anyway as an installation check.
Wipe the area when you do, with a barely damp cloth, which removes dye deposits before heat can bond them.
Clean the rear seat properly on the same schedule as the front — every four to six weeks on a light interior in this climate.
Condition the rear seats a few times a year, which almost nobody does and which is what prevents the compression cracking described above.
Use a permitted protective mat if the child seat manufacturer allows one, checking the installation afterward.
Park in shade where you can, which reduces every one of the mechanisms at once.
Timing repairs around a growing family
There is a practical scheduling point that saves money.
Repairing the area under a child seat while another child seat is about to go back in the same place is money spent on a surface that will immediately be compressed again.
The sensible time is when the seat comes out for good, or when the family is between stages — moving from an infant carrier to a convertible, or out of a booster entirely.
The exception is dye transfer, which is worth cleaning promptly rather than allowing to bond for another two years. Cleaning is cheap; refinishing later is not.
For a vehicle being sold, the rear seat area is worth addressing as part of the pre-sale work, since a family buyer will look there specifically.
And if the seat is coming out permanently, give the indentation a few weeks to recover before deciding whether anything needs doing at all. A surprising number of cases resolve themselves.
What to send for an assessment
Photograph the area with the child seat removed, square-on with the door open, in daylight and no flash.
Take a second shot from a low raking angle, which distinguishes an indentation from surface abrasion far better than a straight-on photograph.
Photograph an unaffected part of the same seat for color reference.
Say how long the child seat was fitted and how long it has been out. If it came out yesterday, the honest first advice is usually to wait a few weeks.
Say whether the mark is a shape, a scuff, a discoloration, or a combination — and whether a gentle clean changed the discoloration at all.
And do the white-cloth rub on an inconspicuous part of the area. Color on the cloth means the topcoat has been abraded through, which changes the recommendation from cleaning to refinishing.
Questions we get asked next
- Will the indentation from a child seat go away on its own?
- Usually, over days to weeks once the seat is out, and warmth helps. Deep impressions from a seat fitted for years take longest. If nothing has improved after several weeks, the foam has taken a permanent set, which is a cushion question rather than a leather one.
- Is it safe to put a towel or mat under a child seat?
- Only if the child seat manufacturer permits it and the installation is still correct afterward. Some manufacturers prohibit anything underneath. The seat must install at the right angle, with correct belt or anchor routing, and tighten to specification — nothing placed underneath may compromise that.
- The leather under the base has a gray haze that will not clean off. What is it?
- Almost certainly dye transferred from the child seat's own fabric, bonded into the finish by heat and time. Fresh transfer cleans off a sealed surface; transfer left for a year or more usually leaves a residual tint that needs the panel refinishing.
- Should I repair the rear seat before the next child seat goes in?
- Generally no — the new seat will compress and rub the same area. Clean any dye transfer promptly, because that bonds over time, but leave the refinishing until the seats are out for good or the vehicle is being sold.
Sources
- Car Seats and Booster Seats — U.S. National Highway Traffic Safety Administration, checked 2026-08-21
- child seats
- pressure marks
- dye transfer